Woodworker's Journal 2004 Summer, страница 61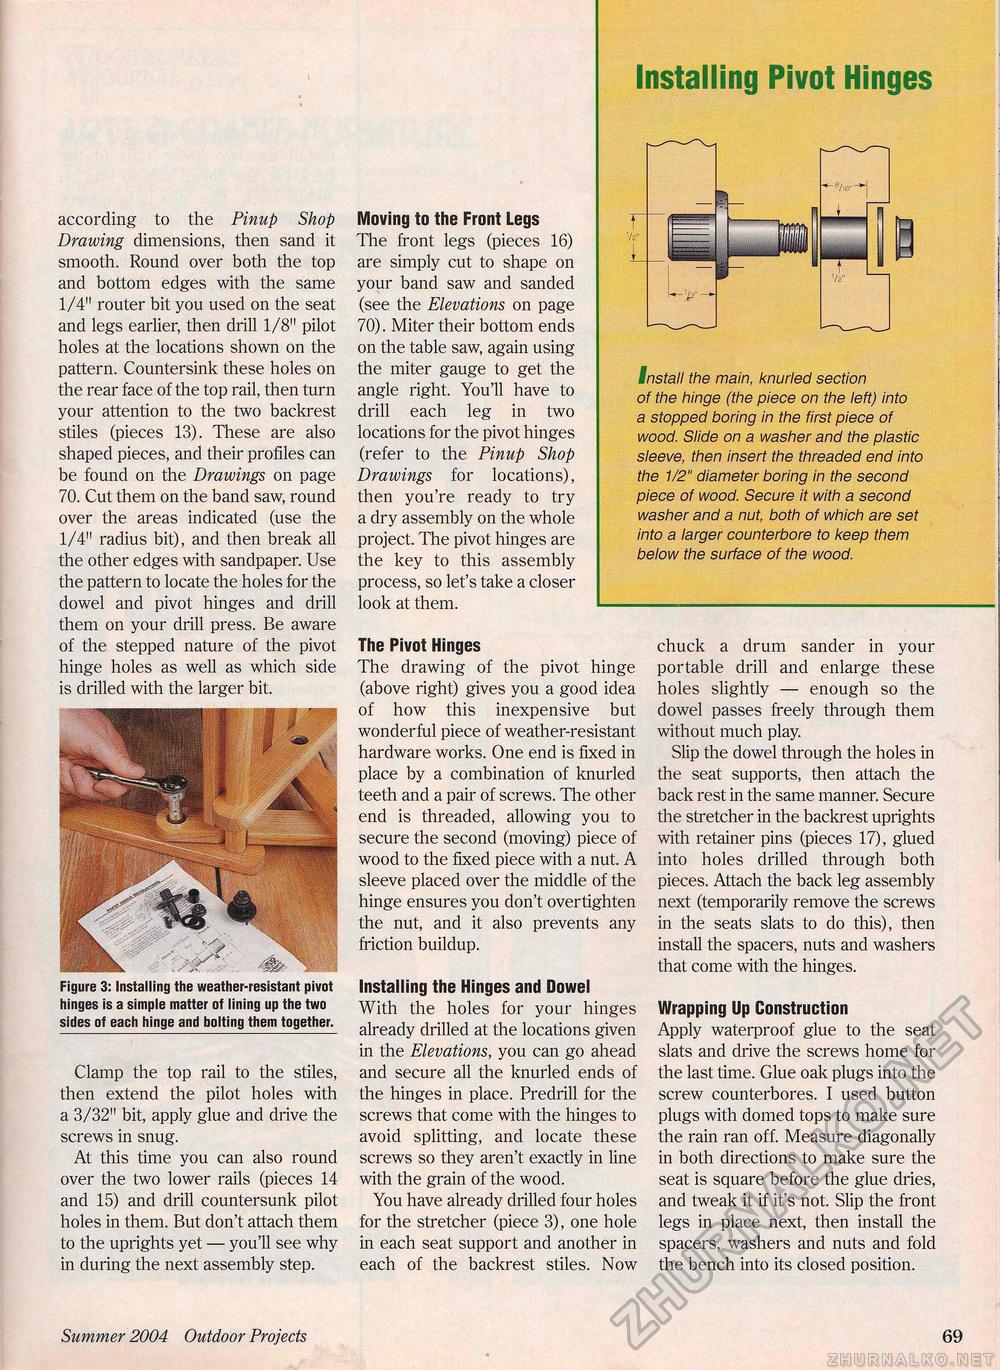
Installing Pivot Hinges Install the main, knurled section of the hinge (the piece on the left) into a stopped boring in the first piece of wood. Slide on a washer and the plastic sleeve, then insert the threaded end into the 1/2" diameter boring in the second piece of wood. Secure it with a second washer and a nut, both of which are set into a larger counterbore to keep them below the surface of the wood. according to the Pinup Shop Drawing dimensions, then sand it smooth. Round over both the top and bottom edges with the same 1/4" router bit you used on the seat and legs earlier, then drill 1/8" pilot holes at the locations shown on the pattern. Countersink these holes on the rear face of the top rail, then turn your attention to the two backrest stiles (pieces 13). These are also shaped pieces, and their profiles can be found on the Drawings on page 70. Cut them on the band saw, round over the areas indicated (use the 1/4" radius bit), and then break all the other edges with sandpaper. Use the pattern to locate the holes for the dowel and pivot hinges and drill them on your drill press. Be aware of the stepped nature of the pivot hinge holes as well as which side is drilled with the larger bit. Figure 3: Installing the weather-resistant pivot hinges is a simple matter of lining up the two sides of each hinge and bolting them together. Clamp the top rail to the stiles, then extend the pilot holes with a 3/32" bit, apply glue and drive the screws in snug. At this time you can also round over the two lower rails (pieces 14 and 15) and drill countersunk pilot holes in them. But don't attach them to the uprights yet — you'll see why in during the next assembly step. Moving to the Front Legs The front legs (pieces 16) are simply cut to shape on your band saw and sanded (see the Elevations on page 70). Miter their bottom ends on the table saw, again using the miter gauge to get the angle right. You'll have to drill each leg in two locations for the pivot hinges (refer to the Pinup Shop Drawings for locations), then you're ready to try a dry assembly on the whole project. The pivot hinges are the key to this assembly process, so let's take a closer look at them. The Pivot Hinges The drawing of the pivot hinge (above right) gives you a good idea of how this inexpensive but wonderful piece of weather-resistant hardware works. One end is fixed in place by a combination of knurled teeth and a pair of screws. The other end is threaded, allowing you to secure the second (moving) piece of wood to the fixed piece with a nut. A sleeve placed over the middle of the hinge ensures you don't overtighten the nut, and it also prevents any friction buildup. Installing the Hinges and Dowel With the holes for your hinges already drilled at the locations given in the Elevations, you can go ahead and secure all the knurled ends of the hinges in place. Predrill for the screws that come with the hinges to avoid splitting, and locate these screws so they aren't exactly in line with the grain of the wood. You have already drilled four holes for the stretcher (piece 3), one hole in each seat support and another in each of the backrest stiles. Now chuck a drum sander in your portable drill and enlarge these holes slightly — enough so the dowel passes freely through them without much play. Slip the dowel through the holes in the seat supports, then attach the back rest in the same manner. Secure the stretcher in the backrest uprights with retainer pins (pieces 17), glued into holes drilled through both pieces. Attach the back leg assembly next (temporarily remove the screws in the seats slats to do this), then install the spacers, nuts and washers that come with the hinges. Wrapping Up Construction Apply waterproof glue to the seat slats and drive the screws home for the last time. Glue oak plugs into the screw counterbores. I used button plugs with domed tops to make sure the rain ran off. Measure diagonally in both directions to make sure the seat is square before the glue dries, and tweak it if it's not. Slip the front legs in place next, then install the spacers, washers and nuts and fold the bench into its closed position. Summer 2004 Outdoor Projects 69 |


